Monday, October 31, 2016

Transfer, Paint, Ink Experiments

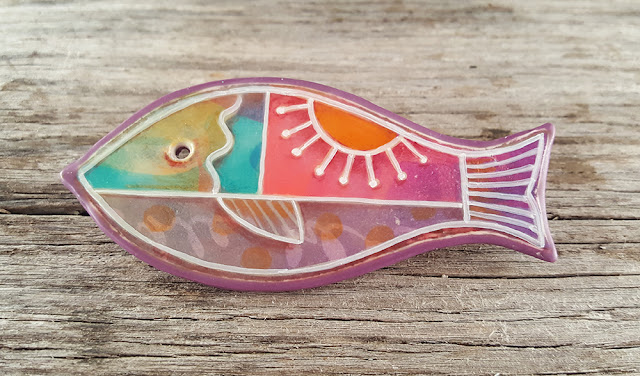
I've been experimenting with liquid clay, toner transfers (learned from Lorraine Vogel's tutorial), colored pencils, inks, and paint pens. I started working with the paint pens as a way to salvage ugly old clay pieces but this weekend I worked on made-from-scratch pieces.

I created my own designs for the transfers with shapes I had drawn and scanned then arranged in Illustrator. After that I layered, colored, sliced and diced in Photoshop.

Layer 1 -- toner transfers. My transfers came out a little patchy but it won't matter for this purpose.


Layer 2 -- I put a thin layer of liquid clay over the transfer and cured it before using oil-paint pens to draw lines. The layer of clay is critical to keeping your pens in working order. If you draw directly on the transfer layer, the slight bit of tackiness of the transfer seems to gum up the works.

The "extra fine" point Sharpie pens make the nicest lines. I also tried the relatively cheap CraftSmart brand at Michael's and a more expensive Sakura pen but the Sharpies work well and don't remain gummy after I do the final spray of PYMII. The CraftSmart pens stayed a little tacky so I don't recommend for this purpose but they could be pretty decent for other uses.

The pic of the four pieces were done with the Extra Fine point; the fish was done with the Fine Point which is actually fairly thick).

I put a thin layer of liquid clay over the ink lines once they were dry and cured the pieces.


Layer 3 -- I started shading with colored pencils but they didn't like the liquid clay surface. So I pulled out my favorite ballpoint pens, Ink Joy by PaperMate, and started shading. I shaded as though light was coming from above to give the pieces a bit of 3D effect. After coloring I put another layer of liquid clay on the surface and cured it.


I discovered the purple pen bleeds. I had to touch up the white lines on the tall skinny spike before going further. The orange pen bleeds a bit also so I touched it up too.


Layer 4 -- I glued a clutch pin back on the back of each piece. I covered the backs with a full sheet of a coordinating color that I wrapped around the edges and trimmed flush. I covered the front surface with another layer of liquid clay before curing. The last liquid faded the white somewhat so I revived it with a white pen. When the piece was dry, I gave it a spray of PYMII to protect the last white lines.


Friday, March 4, 2016

New York City "Photo Fishing"

When I'm in a city environment with my camera phone, I turn it on and click-click-click as I walk along the street. I usually use the "cartoonify" filter on my Samsung Galaxy Note because I love the faux screen-print look it gives.

I take several hundred pictures and then go through them to see what I "caught" just like a fisherman dragging his line in the water.

Sometimes it's just a little section of the picture that I like and I blow it up. For example, this:


came from a small section of this:


Then I take the photos into Photoshop and mess with the colors and exposure, crop in to capture the interesting parts, and apply various filters and effects to the pics to "dirty 'em up." I am in loooove with the poster edges filter.

Manhattan 3/3/16
Military Mini

I often take pictures of windows because reflections can introduce collage-like visual textures in the image.
This is my favorite of the bunch.
I call it an "in-camera collage" because it's got so much goin' on!

This looks like Beatle shoes crossing the street. Abbey Road from a different angle?

Manhole

Waiting to cross

Morning Trudgery

The Lunch Date

Classic

Lady and Little Dog

Saturday, February 20, 2016

My Sleep Talk videos


I made a permanent page for my sleep talking videos. I post them on Facebook but if you're not a Facebooker, you can see them here.

Sunday, January 3, 2016

Tutorial: Super Easy Earrings to Match Your Outfit

I think we all agree that part of the fun of clay is the ability to whip up jewelry to match any outfit. Here's an easy way to make half-moon curved dangly earrings. 


Mix up an assortment of colors roughly like the colors in the garment you want to match.

Roll each color on the 3 setting (on my pasta machine, 1 is the thickest) and
tear into rough edged strips. Work with the strips on a small smooth tile so you can easily
move it around to roll it, and hold it up next to your garment as you work.
Roll the layers with the acrylic rod to flatten the them. It's important to roll along
the length of the strips and start in the center and work out to the center. Otherwise you
may just worsen gaps between the colors and not end up with a smooth surface.
I needed to muddy the colors up a bit and work some sparkle in, so I added a thin layer of metallic clay to the back and blended some more with the gold on the inside.
Fold the clay in half with the fold on the short edge of the stripes.
Run it through the pasta machine several times to blend the colors for a softer effect.
I should have used the magnet on the roller trick to keep the clay from getting too wide.
But I didn't, so instead...
...I ripped off the blue and purple from the ends and put them back into the center.
I was planning on big earrings, but not that big! I needed to make sure all the colors stayed within a 2-2.5" area.
I checked the colors against my top every so often to see how my blend looked.
I ended up liking the back side of the clay so I flipped it over.
I waited to the end of my blending to add a strip of black so it wouldn't overtake the other colors.

When I was happy with my colors, I backed the sheet with a layer of black
and rolled it lightly to make sure the layers adhered to each other.

I determined where I wanted the colors to hit inside the circle, making sure to get
a little bit of purple and green because they are prominent colors in the shirt I was matching.

I laid the circle on a curved surface to cure.
This is the bottom of a soda can that the ever-helpful Jan Montarsi gave to me.

Cut the circle in half. (I used my blade while the clay was on the curved form.)
I used the point of a bamboo skewer to create the holes. I gently poked it in and then
wiggled it in a tiny circular pattern until the hole was the size I wanted.

I cured the clay, sanded the finished pieces, and buffed them.
I made earwires out of two head pins and voila, earrings to wear out to a lunch with friends.

And here's what they look like on!


LinkWithin

Related Posts with Thumbnails