 |
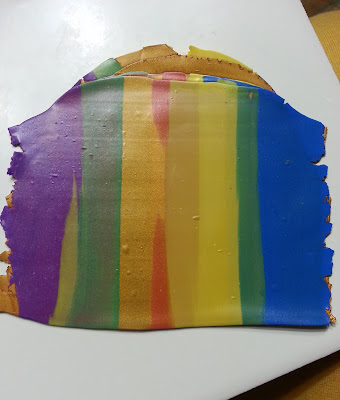
| Mix up an assortment of colors roughly like the colors in the garment you want to match. |
 |
| ...I ripped off the blue and purple from the ends and put them back into the center. I was planning on big earrings, but not that big! I needed to make sure all the colors stayed within a 2-2.5" area. |
 |
| I checked the colors against my top every so often to see how my blend looked. I ended up liking the back side of the clay so I flipped it over. I waited to the end of my blending to add a strip of black so it wouldn't overtake the other colors. |
 |
| When I was happy with my colors, I backed the sheet with a layer of black and rolled it lightly to make sure the layers adhered to each other. |
 |
| I determined where I wanted the colors to hit inside the circle, making sure to get a little bit of purple and green because they are prominent colors in the shirt I was matching. |
 |
| I laid the circle on a curved surface to cure. This is the bottom of a soda can that the ever-helpful Jan Montarsi gave to me. |
 |
| Cut the circle in half. (I used my blade while the clay was on the curved form.) I used the point of a bamboo skewer to create the holes. I gently poked it in and then wiggled it in a tiny circular pattern until the hole was the size I wanted. I cured the clay, sanded the finished pieces, and buffed them. I made earwires out of two head pins and voila, earrings to wear out to a lunch with friends. |
 |
| And here's what they look like on! |


Great tutorial, thanks for explaining your use of color and how you muted them, made changes along the way and the tip about adding black at the end. I may not make these earrings but the information and process is so valuable to me! They look perfect with your top...very pretty!!
ReplyDeleteHappy New Year! Thanks for this nice, simple tute. Showing the addition of the gold metallic and the black stripe was very helpful. The earrings look wonderful with your top. Cute model.
ReplyDeleteSo nice! Thank you for sharing!
ReplyDeleteAnd what if you cut in the other direction? Will the earrings be striped vertically? :-)
LDS BEADS
So nice! Thank you for sharing!
ReplyDeleteAnd what if you cut in the other direction? Will the earrings be striped vertically? :-)
LDS BEADS
LDS, yes they would be striped vertically if you cut the other direction, but they won't have all the colors unless you plan your stripes to be symmetrical. To make the earrings mirror-image symmetrical, put one color in the center, and add strips in the same order to each side. Cut in half at the center color strip.
ReplyDeleteThese are awesome!
ReplyDeleteCool !!! With pleasure I will try!
ReplyDeleteMy daughter liked the beads from polymer clay that makes her dad :)
Since she was only two years I have done for her clip on earrings. She loved it!
On photo are materials from which they are made and the final result :)
Photo: https://www.facebook.com/photo.php?fbid=1103847362988191&set=a.363992266973708.82973.100000888142412&type=3&theater