

Saturday, July 31, 2010
Artist: Tejae Floyde
Tejae liked my little colorful etched beads and commented on them at my flickr page. I liked her hearts and said they looked like a good match for mine. So we engineered a little trade. I have a cute little red heart pendant that needs some friends to hang with. It will be a while before I can get to it (the real world is intruding on my fantasy clay life -- worked three days until midnight and will spend all day there today!!!) so in the meantime, go check out Tejae's blog to see the heart she made for me, and below are some that stand up.They remind me of little chess pawns. Visit her etsy shop too while you're at it.

Thursday, July 29, 2010

Tuesday, July 27, 2010


Monday, July 26, 2010
Artist: Lynda Moseley
 Lynda Moseley, the divine SCDiva (aka DivaDesigns1 on flickr.com) used one one of my lions in an African inspired necklace. See it here...
Saturday, July 24, 2010


Fun: PPCG October Retreat:

If you're new to clay, or even if you've never tried it but think you'd like it, this would be an easy way to dive right in. We'll have mini-workshops to learn techniques and you would only need basic tools and a few blocks of clay to get started.
What if you're an old hand at clay, but don't live near Pittsburgh? That doesn't matter either...we have attendees who travel from Michigan, New York, and Ohio every year. If you'd like to join us for the weekend, let me know!
Click on the flyer at left to enlarge it.
Friday, July 23, 2010


Thursday, July 15, 2010


Monday, July 12, 2010

Projects: Clare + Sue = New Necklace
I finally organized myself and made my necklace with the beads I bought from Clare Scott. I had two from SueBeads that coordinated nicely so they got tossed in the mix. I kept it very simple...I had tried to add more but it just wasn't working. I wanted to keep the focus on the glass so I took out all the extra. Now it's just glass and chain, and I like it.


Saturday, July 10, 2010
Beads: I decided on a name
The etched designs remind me of an old-fashioned story so I'm going to call the whole series "Tales" and with specific titles for individual sets. The gang on flickr and here gave me some good suggestions that are going in the "name bucket" in my head. The dark etched ones below are called "Sleepy Hollow" and the gold etched beads are "Sari." I gotta name them something so I can keep them all straight!


Friday, July 9, 2010
Tips: The best thing for cleaning clay off my hands is...

Goo-Gone also works great, but after I used it my skin felt sort of dried out, and after the Bi-Facil, my hands feel smooth and a little bit moisturized. Olive oil also works, and I suppose vegetable oil would too, but surprisingly Baby Oil gel did not work at all in my test.
Wednesday, July 7, 2010
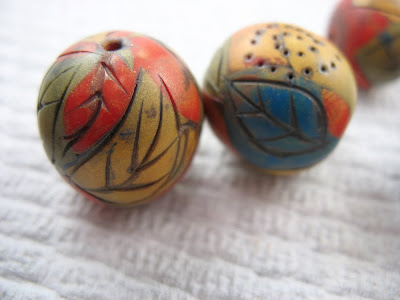
Beads: Calling Gauguin!
Believe it or not, I began work on these with the intent to make another set of the Harlequins described a few posts down. But after I had placed all the diamonds, I just decided I didn't like any part of it so I kept working. One color section looked vaguely like a leaf so I started etching them all around. I love them!


Tuesday, July 6, 2010
Pittsburgh Neighbors: Cardamom Press

At right is the Smithfield Street bridge that I drive across to get to my office every day. She features 4 other landmarks in the $5 card set.
And for something not at all elegant, go look at my own Pittsburgh-themed pastel artwork!
It commemorates an actual sight I witnessed two years ago and snapped with my camera to capture in pastels later. I have a pile of these as 5x7 postcards so if anyone wants one, email your address to me (berecca [at] aol) and I will mail one to you!
Monday, July 5, 2010
Babel Fish Translator: Just added, and so easy!
I just found out how to add the Babel Fish translator to my blog. If you want to read my blog in your own language, look for the translator toward the bottom of the right-hand column.
If you want to download the translator for your own website, I found it here:
Just add an html gadget to your page, and copy and paste the line of text that Babel Fish gives you when you click on the "I want this one" button.
 And speaking of fish, this trio is swimming off to a customer in Massachusetts tomorrow!
Pendant or Toggle?: The user can decide
The diamond face will pass through the diamond shape in the larger piece but it's too big to fit in the cut-out if both are laid flat. An enterprising jewelry maker, with more toggle experience than I have, might be able to fashion a toggle clasp out of the two pieces. Or, the pieces could simply be pendant and bead in a necklace.
The face diamond has a hole running from top point to the bottom point. There are no holes in the large piece but you could use a drill bit to make a hole if needed.


The face diamond has a hole running from top point to the bottom point. There are no holes in the large piece but you could use a drill bit to make a hole if needed.


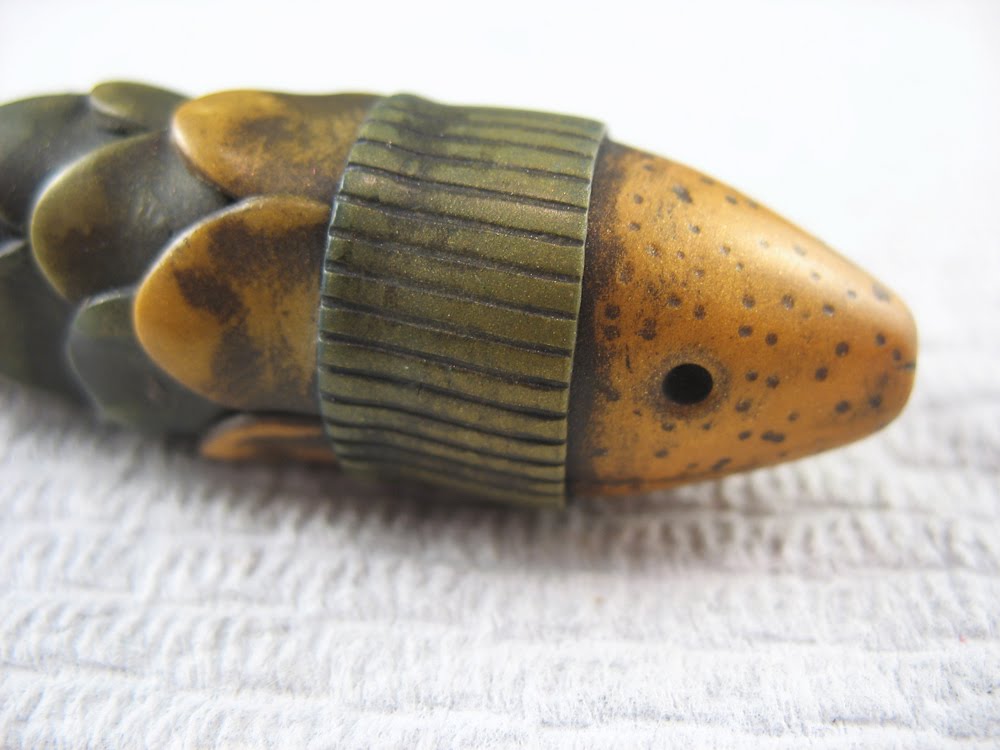
Beads: Fish in a turtleneck
The little fishie from the previous post had a tail malfunction -- his tail broke because it was too thin. I made another that's larger and has a fatter tail, and bonus...he's wearing turtleneck scales!


Sunday, July 4, 2010


Saturday, July 3, 2010
Scrap Clay Tutorial: Harlequin Beads

These Harlequin pattern beads were super easy. I don't have photos of the process, but what do you expect? It's a free tutorial! (These instructions presume you have basic knowledge about working with polymer clay.)
Here's how to make the Harlequin beads:
- Grab the scrap pieces from your work table. Add some gold to the mix if there isn't some already and roll it in a ball. (I say you can never go wrong with gold!)
- Flatten the ball until it will go through the pasta machine on level 1. Fold and roll the clay several times until you have a pretty, watercolor-like mix of colors on your sheet.
- Slice the sheet into squares (I don't measure...I just eyeball it.)
- Condition a sheet of black clay; roll into a long cylinder.
- Randomly choose the colored squares and press them onto the cylinder in a diamond pattern. Align the squares point-to-point so the base black alternates with the colors. (I pressed 4 colored squares around my cylinder and kept going until my squares of scrap were gone.)
- After the cylinder is covered. roll it a few times to work the tiles into the base. Slice the cylinder into segments, cutting so each is two diamonds long.
- Roll the segments in various ways to make the shape you like.
- If you want to add texture, etch lines by rolling the threads of a big bolt on the surface. You can make parallel or random, crisscrossed lines.
- Brush a light layer of black pearlex powder over the whole bead.
- Bake
- Sand to remove the surface powder, leaving it only in the etched lines.
- Finish the beads to whatever level of gloss you prefer.


Thursday, July 1, 2010
Fish Tales: One fish, two fish, probably lots more fish
About six years ago, a friend gave me a betta fish for my desk at work. After a long time he died and I decided he shouldn't be gone just because he was no longer living. (Interesting factoid: Their bright color fades and the huge flowy fins shivel up to nothing as soon as they die.)
So, I dried him on a paper towel for a few days and coated him with Polycrylic -- which preserved him amazingly well. He is mounted in a little frame that I painted and wrote below him, "Poor, Poor Fishie." He sits on my desk to this day!
The fish below were never living so they would be happy to be mounted on a string and turned into a necklace or some such thing. I think I see more polymer fish in my future...
Minnow

Big Green Fish

Subscribe to:
Posts (Atom)