Sunday, March 31, 2013

Inspiration to develop my skills and style

There was lots of talk at Synergy III about "finding your own voice" as an artist and how to use inspiration to help  further develop your own style. I think I have my own style but I lack precision and finesse, usually because I'm in a hurry to cram too much into my limited free time. (I still spend my weekdays, as my brother says, Working for the "Man!")

In Seth Savarick's session at Synergy he talked about raising your work to the next level by having a plan before starting, being deliberate during the construction phase, and doing detailed finishing at the end of a project. Especially the finishing! He showed examples of work that he thought had promise, but the lack of attention to finishing kept the pieces from being stand-outs. Certainly he and others who were there, such as Dan Cormier, Melanie West, Melanie Muir, and Kathleen Dustin, exhibit a level of finish on their pieces that is unbelievable when you see them in person.

I decided I should work on more complex projects that require planning, precision, and polish to improve those aspects of my work. My inspiration was an interesting bracelet that Christine Dumont wore one day during the conference. Unlike a typical polymer bangle, it was not solid, and I found that idea appealing. You could see through her bracelet because she made it out of individual pieces with negative spaces between them.

With that concept in mind, I sketched a pattern for a bangle with cut-outs using my usual floral motif and then set about creating my "first draft" to see what works and what doesn't.


  • As it turned out, the form I used was the right size initially but I forgot to consider that the form would add to the circumference and as a result, the finished bangle is too large so it's not wearable (on my wrist). 
  • I created the black inside layer first and then put the colors on top. I might need to do the colors first, then apply the black to the inside after the form has been removed which would reduce the size of the opening. I would also be able to finish the inside (which looks terrible right now.)
  • I will construct the banded edges differently to make them smoother.
  • The bracelet is heavier than might be comfortable, so I need to determine if I can make the layers a bit thinner.

But, technical difficulties aside, I like the look of it a lot!


Saturday, March 30, 2013

Deconstruct/Reconstruct

At Synergy III in Atlanta this month, I attended Jeffrey Lloyd Dever's session where he shared his favorite unconventional materials with us. (Check the link above to see an installation of his charming, biological-ish pieces made of polymer clay and oddball ingredients. At about 2:05 on the video you can see a close-up of the pieces in the wall-mounted display.)

Among the many good tips he provided was how to find beads for a fraction of what you would pay at a bead or craft store.

I remembered his advice today when I was out shopping and enjoying the glorious sunshine.

<<<< And look at my fast, easy, and fun new necklace, made with less than $4 in materials.

So what is it made of?

Bamboo bead placemats that were on sale at Bed, Bath & Beyond for $2.99 each (and I only used about 1/4 of the beads in one mat). The small turquoise stones were on sale at Michael's for $2.50.

There are 100+ beads in each placemat -- enough to make several pieces of jewelry. Sweet!


Thursday, March 7, 2013

I'm going to Synergy...who else?

I'm going to Synergy...who else? Anyone need a ride back to the airport on Sunday morning about 9:30-10 am? I would like to share a cab or a car service. You can email me at berecca at a o l  dot c o m if that time works for you.

My of my clay jewelry will be fairly simple but you will probably see me wearing these big fellas and more of their colorful brethen fashioned up into a conga line.

Saturday, February 23, 2013

Reflections

I like taking pictures of things in windows* because of the layers you can see all in one glance. Here's one I took at Universal Studios Orlando where the streets are set up like an old Hollywood backlot of New York City. Of course I did my favorite Poster Edges filter and boosted the color in Photoshop to make it more interesting.
When you shoot the images, look at your scene carefully before you snap to make sure the actual elements and the reflections line up in a pleasing way.

* see others here and more Photoshop filters here.

Saturday, February 9, 2013

As Nina Garcia would say...

...There's a taste level problem here.

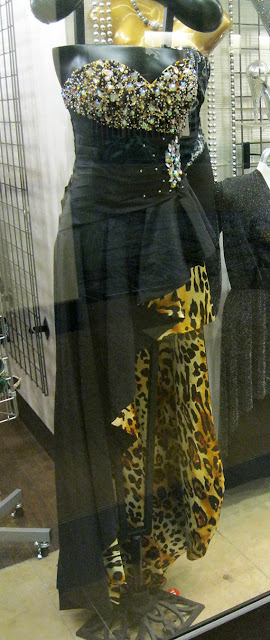
My workplace's building has touristy shops on the first floor. One store offers clothing that suffers from a "lack of editing," to quote Project Runway again. 

All items, from jeans to gowns to jewelry, have about a half dozen-too-many design elements, chosen for maximum look-at-me-ness. Each dress features stew of sequins, strapless, backless, sheer netting, cut-outs, cut-down-to-there, cut-up-to-there, asymmetrical hems, ruffles, plastic jewel encrusting, foil imprints, animal prints, rosettes, grommets, laces, chains, laces...you name it.


Take the dress at right for example. Remove the:
1. leopard lining
2. high-low asymmetrical hem
3. encrusting on the side wrap
4. whatever might be happening in back (You can't see the reverse so god only knows what's going on there.)
...and it could be wearable, if the plastic "jewels" don't look too bad once you get close.  

A different section of the window display, while still trashy, makes for a fun Photoshop project.

See below...
The original photo.
The second dress on the left has foil, sequins, an under mini skirt with a high-low asymmetrical over-skirt of lacy ruffles and a strapless sweetheart neckline. Niiiice. The black number on the far right on the right body on the right occasion might not be bad.

I made a duplicate layer of the original photo and used the Paint Daubs filter on it.
I don't know what the settings were...I just messed around until I liked how it looked.

I duplicated the original layer again and used the Poster Edges filter on it.

I added a layer mask to the top layer (Poster Edges) and used a wide brush at low flow to paint out the
Poster Edges where I wanted the soft Paint Daubs layer to show through.
It's still trashy, but now it's trashy and dreamlike.
 And sorry, still no new beads to show. Since November a new romance has filled most of my former clay time and it has its own kind of creative energy. But never fear, I'll get back to the worktable eventually.

LinkWithin

Related Posts with Thumbnails