Showing posts with label beads. Show all posts

Sunday, November 12, 2017

Tutorial: Chalkboard Beads


I received a request for a tutorial on these beads. 

The most critical part of this process is having the right kind of stamp. I designed the stamps because I couldn't find any like what I needed. 

The difference: the negative space of the stamp design needs to be the "solid" portion in your artwork so that it will end up as the raised part on the stamp -- the part that makes the impression. In other words, these stamps are set up in reverse of how most stamps are created. 

The stamps look like this:


The artwork that I had turned into stamps looked like this:


I like the design element to extend into the border area so each element breaks the edge of the frame. 


How to Make the Beads

  1. Roll a sheet of black and impress two stamps. 
  2. Cut each one out leaving an equal amount of space around the edges of the impression that is wider than the border you eventually want to have on the bead.
  3. Cut a third rectangle of clay that is the same size as the two impressed pieces. 
  4. Cut a strip out of that third piece to leave a channel for the stringing cord. (After cutting out the cord channel, the third piece is now actually two separate pieces of clay.)
  5. Place one of the impressed pieces face down on your baking cardboard making note of the "top" edge, if that matters in your design. 
  6. Lay the two channel pieces on top of the impressed piece leaving a channel where you want your stringing cord to run. 
  7. Place the second impressed piece face up on the stack, making sure the "top" of this piece is aligned with the top of the face down piece. 
  8. Gently pat to ensure that the layers are adhered to each other.
  9. Trim all four edges of the bead to make the stack even and smooth on all sides. 
  10. Your channel hole may disappear momentarily, but gently insert an awl or skewer to open the hole and channel up again.
  11. Cure the bead.
  12. After it is cured and cooled, sand it a little to get the roughness off the surface. 
  13. If you want to make the edges of the bead smooth instead of sharp, sand all the edges and corners to give the bead a worn feel.
  14. Use a tiny bit of white acrylic or oil paint to cover the surface very lightly, then wipe most of it off with a very level, light touch. My stamps have fairly shallow impressions so too much paint will overwhelm it and using a hard touch when wiping the paint will probably remove it all. 
  15. After the paint dries, sand the bead again to get any remaining paint off of the high surfaces.

You can also use copper metallic clay and paint it with a mix of turquoise and white to look like copper patina. Two samples are in the photo at top.


There are some of my stamps available in my etsy shop. Just go to etsy and type in Artybecca to find it.

I get my stamps made by www.readystamps.com because I can squeeze a bunch of designs on a 7" x 9" area and then cut them apart.

There are also stamp makers on etsy who will turn your design into a stamp. I have not used them so I can't vouch for any in particular.

Monday, January 16, 2017

Embossing Powders on Polymer Clay


Update 8/17/28:
 :(  The embossing powder on clay doesn't hold up over the long run. It gets gummy and un-shiny.  If your need for super glossy only has to last a short while, go ahead and try it.
----
A few weeks ago I bought a heat gun and then last week I saw a video on Instagram in which gold embossing powder was used on calligraphy. These two unrelated events caused two more things to happen: I thought, "Hey! I can use embossing powders because now I have a heat gun." And I headed off Michael's to get some embossing powders.

At first I just got gold and white, and a mixed sample kit of black and silver, along with two Perfect Pearls glue pens (brush and bullets points), and an adhesive applicator with a sponge top.

My initial thought about the embossing powder was, "Yay! Finally, there's a way a way to make bold, opaque metallic lines on a bead. (And, also, now I want to learn modern calligraphy!)

So the first experiments were these:


But then, two more things happened:
1. As I heated the bead while it was mounted on a skewer, I saw the similarity to flameworking.
2. Now that I knew the powders were functioning as I had hoped, I bought more powders: sparkly gold, white, black, bronze, sparkly black, silver, clear, and chunky gold.

I pulled some not-so-good beads out of my stash and used the embossing powders as faux flameworking, though I think the finished products look more like ceramics than glass.

HOW TO:
I put a cured bead on a skewer. The bead had been made on a skewer so the hole was tight enough that the bead didn't slide up and down and then I went to town...

The original bead was mostly turquoise with some gold and yellow on it. I very, very lightly coated the bead with the Perfect Pearls adhesive in a sponge top applicator. I sprinkled a tiny bit of scrap powder all over the bead and hit it with the heat gun on the lower speed.
I have a Black & Decker heat gun with two speeds. The lower speed doesn't blow the powder off if you hold it at a distance and only move closer when the powder starts to melt.

After the first layer of powder is on, you no longer need the glue. If you turn the skewer while heating the bead the surface will be warm enough to make the powder stick.

Next I sprinkled on some white. I sprinkle the powder directly from the container. Put a piece of paper below where you're working to catch any excess and put it back into the container.
Or, if that's too much trouble, dump all your powder "scraps" into one container and use it as the base for your next beads.


More gold.
Sometimes I put layers of clear between the opaque layers to give the illusion of depth.


...and chunky gold...


If you keep the heat in one spot, the powder will begin to break up (a little bit is good but don't over-do it -- the melted powder will flow if you're not careful.)

Keep the bead on the stick a while to let it cool off. But if you get impatient and you touch it while it's still warm and leave a fingerprint, no worries! Just hit it with the heat again and the fingerprint will melt right out.
If you get a few bubbles from air trapped between the layers, wait until the bead cools a little, pat the bubble with your finger, and then melt the fingerprint.

CLEAR EMBOSSING
In the example below I didn't want to cover up the pretty colors underneath so I put the adhesive on the bead and sprinkled it only with clear powder and the chunky gold bits which I had mixed together.


I made a video to show the basic process. You can't see detail but you'll get the idea.
(If you can't view it on your phone, view it on a laptop. I don't know why, but the video that was shot and edited on my phone, cannot now be viewed on my phone when I try to launch it from the blog. Go figure.)


I tested the beads to see how well the finish holds up. I threw the clear one above 
 10 times and there's not a scratch or crack on it. See the video...


Sunday, June 28, 2015

Cane Evolution Tutorial

I am not a caner but after my guild's recent workshop with Carol Simmons I had leftover cane chunks to play with. My usual work is more blendy than a typical cane and I favor large patterns over small so I "blew up" my cane.

Here's how I made these...

...from these leftover 1" tall cane slices:

1) I placed a few slices of cane on a sheet of lime colored clay that was about 3 times as thick as the cane slices. Then I ran the sheet through the pasta machine on successively thinner settings (from 1 to 4-5). 

2) I alternated the direction I fed the clay through so the cane would stretch in both directions. The cane clay was more leached than the underlayer so the the cane cracked a bit as it stretched, letting the green underneath show through. 

3) I rolled a log of scrap clay, sliced it into equal portions, and rolled each piece into a ball. 

4) I ripped the cane sheet into random pieces and wrapped them randomly around the ball, covering it completely. I rolled the ball until all the wrapped pieces had melded together. I turned two of the balls into long barrel shapes.

5) With my needle tool I traced lines to loosely define shapes of leaves and petals. 

6) I baked the beads for 15 minutes and then lightly sanded with 1000 grit wet-dry sandpaper. 

7) I rubbed black liquid clay into the etched lines and wiped off the excess with a paper towel.
Then the beads went back into the oven for 15 more minutes. 

8) I sanded them again with 1000 grit. I could have stopped at this point but I like them shiny so I used my buffer.

The cane slices on the beads below were put on a lilac base layer. I didn't etch these beads. I wish I would have, the design would have looked more "focused."

So, there you go. Grab some of those old canes and blow 'em up!


Sunday, June 21, 2015

Great Smokies photo inspires a necklace

My coworker Ashley Macik attended a photography workshop called Spring in the Smokies with instructor Jennifer King a few months ago. She came back with beautiful photos. I really liked the colors in the one at left below so asked if I could "borrow" it for a bead project.

First I pulled out a few colors from the photo:


Then I got to work with my new clay color mixing skills learned in Carol Simmons' workshop in May. I used Premo fuchsia, ultramarine blue, and cadmium yellow, plus black and white to make the 5 colors. I made a variety of shapes and sizes, some etched, some plain. Below are a few after the first baking. Next step: fill the inscribed lines with black liquid clay.

I strung them up but couldn't get them to drape the way I wanted. I also decided I needed more beads because the necklace wasn't long enough.


I made a variety pack of additional beads and strung them up. Ultimately I chose not to use the large round tree bead... I just didn't like it enough. The red and gold each should have been a bit more orange-ish and the eggplant could have been a bit more purple but the colors all look decent together.
I will wear this with an eggplant-colored t-shirt and black skirt.


Tuesday, June 23 P.S.: What a nice surprise to find out I'm on Polymer Clay Daily today. Thanks Cynthia!

Saturday, October 11, 2014

Faceted Faux Gems, or Wilma Flintstone's Fancy Jewelry

I received a request for instructions on how to make these fun faux gem beads. Sorry, I don't have photos of the steps but will take some the next time I make these giant gems. I know picture tutorials are helpful for my non-English-speaking friends but Google translate can help until I take more photos.

The process is pretty easy. See below and see this older post for another variation on this idea.


1. Roll Sculpey Ultralight ito beads of assorted shapes and sizes. Oblong, square, round, whatever you like. Feel free to make 'em big...all of the beads in the photo are at least one inch long.

2. Poke the hole through them and bake according to instructions on the package. Don't let the beads cool after curing because the clay slices easier when it's a little warm. Cut a few beads at a time and keep the others in the still-warm oven until you're ready to cut.

3. Using an X-acto blade, slice small slivers off the bead. Be sure that none of the original baked surface remains. The baked surface doesn't take the alcohol ink as well and will leave light spots on the beads. However, that's not a bad thing because it makes it easy to find where you forgot to cut!

4. Now, get your alcohol inks. Cover the entire bead with the lightest color you plan to use. When it is dry, put the next darkest color on a portion of the bead, leaving some of your first color showing. Go ahead and add a third color if you want to make them more colorful. The colors will blend and get a bit muddy -- don't over work it. Use a smooth paper towel (Viva is my favorite!) to dab it on for more control. Wear gloves if you don't want to end up with ink-stained hands.

5. Optional step... See the bright blue spot on the bead at front left above? After you have finished putting all the ink colors on the bead, you can shave away the surface in a few spots to reveal the white underneath. Put a swipe of light ink on the white spots. The relative brightness of the lighter spot makes it look like there is a glowing light inside the bead.

6. After the beads are completely dry, rub gold Gilder's Paste along the peaks of the sliced edges. (Inka Gold water-based pastes may work also, so give it a try.)

7. When the Gilder's Paste is dry (I usually wait a day but that may be longer than necessary), spray the beads with PYM II to protect the surface. PYM II is great stuff... it doesn't change the color at all.

That's it!

I will post a follow up photo of the finished necklace. I made flat-ish disks out of gold and strung them between the gems to add new texture to the mix. I wore it to work one day and as a group of women passed me in the hallway, I heard one say, "See, *she* wears big jewelry!" Fortunately it was in an approving tone!

Monday, January 6, 2014

Tutorial: Ribbed and Wrapped


Someone asked for a tutorial on the ribbed beads with the twisted ends that are shown in the header of my blog and in the photo above.
Here's the process:

Start with any color you like. This is on the thickest setting of my machine.

Add other colors and put through pasta machine multiple times to blend it. Put it into the pasta rollers in the same direction every time to end up with stripes.

I didn't think I had enough colors so I added more.

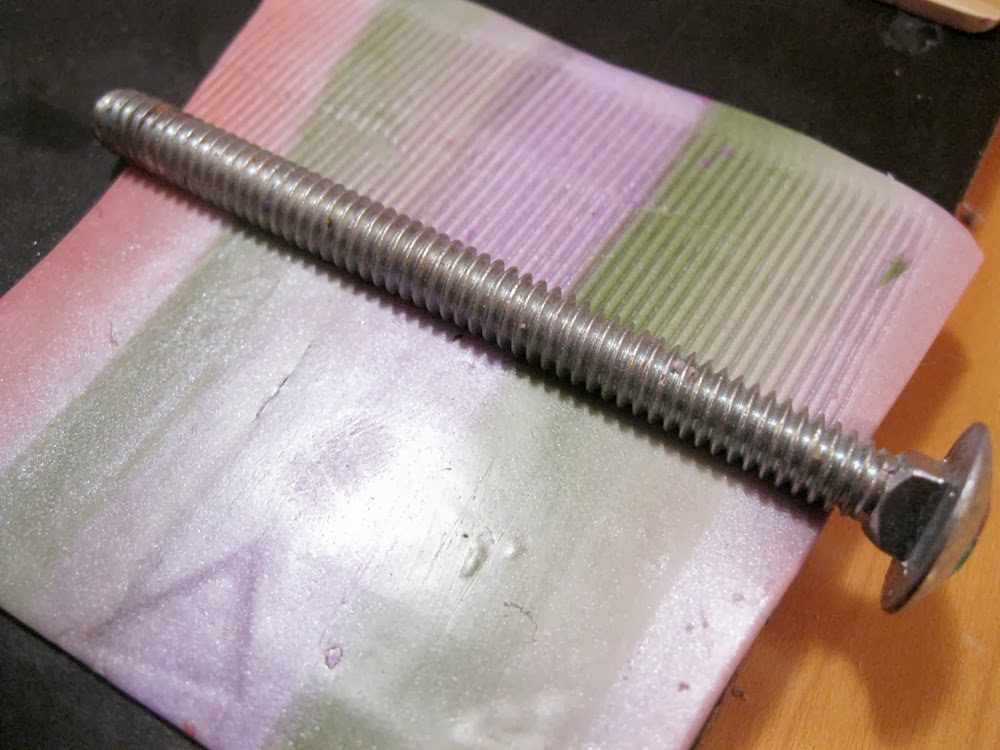
Use a long bolt to create the ribs. Make sure it will be long enough to cover your bead form.

Line a pre-baked bead up at the end of the sheet making sure to keep holes pointing out to each end of the sheet..

Wrap ribbed sheet around the bead. Trim and fit where the start and end of the sheet meet.

Holding the bead with your fingers on each end, gently pinch and twist the edges while turning the bead around and around.
Be careful not to squish the ribs. I use Kato clay which is firm and holds its shape well. I don't know what kind of results you would get with other brands.

Twist it a bit more.

Slice off the ends to make them straight and gently pat the edges to round them.

Brush the whole bead with a mixture of  carbon black Pearl Ex and a tiny pinch of Pearl Ex gold for shimmer.
Bake according to the instructions for your clay.

When it's cured, sand the bead with a purple 3M Sandblaster 400 grit sheet, to remove the black from the high surfaces but leave it in all the grooves. You can leave it matte or buff it with a muslin wheel.
I don't recommend using regular sandpaper. It is not flexible and will end up removing too much from the high spots and not enough from the grooves,. Your bead will probably end up splotchy instead of prettily graduated.

And there you have it!


Thursday, September 5, 2013

Another entry in the hollow bead sweepstakes

Lightweight, fast, and easy...making big hollow beads in angular shapes is easy with print-cut-fold-and-tape PDFs.
Six shapes on five sheets: 3- and 4-sided diamonds, cubes, pillows, pyramids, and 4-sided long cylinders are available for download from this page. (They are free because I did not invent geometry! I just put them on a page you can download and print.) The sheets have one or two shapes on them, and some have more than one size on a sheet.

Carol Simmons and I experimented with shapes and finishing styles on the beads we're modeling below. We made a bunch at a recent retreat and turned them into a temporary necklace. It was dismantled and now we each have an assortment of beads that we'll mix with others. A few of my other experiments are below. 

Go download the templates and let me know how they work for you. I do not guarantee that they are flawless -- hole punch spots may be slightly off so "fold first, punch holes later" and if you find mistakes, let me know. Basic directions are on each sheet. All suggestions and questions are welcome!


This is all four sides of a single bead made with the 4-sided diamond template.


Saturday, March 30, 2013

Deconstruct/Reconstruct

At Synergy III in Atlanta this month, I attended Jeffrey Lloyd Dever's session where he shared his favorite unconventional materials with us. (Check the link above to see an installation of his charming, biological-ish pieces made of polymer clay and oddball ingredients. At about 2:05 on the video you can see a close-up of the pieces in the wall-mounted display.)

Among the many good tips he provided was how to find beads for a fraction of what you would pay at a bead or craft store.

I remembered his advice today when I was out shopping and enjoying the glorious sunshine.

<<<< And look at my fast, easy, and fun new necklace, made with less than $4 in materials.

So what is it made of?

Bamboo bead placemats that were on sale at Bed, Bath & Beyond for $2.99 each (and I only used about 1/4 of the beads in one mat). The small turquoise stones were on sale at Michael's for $2.50.

There are 100+ beads in each placemat -- enough to make several pieces of jewelry. Sweet!


Thursday, March 7, 2013

I'm going to Synergy...who else?

I'm going to Synergy...who else? Anyone need a ride back to the airport on Sunday morning about 9:30-10 am? I would like to share a cab or a car service. You can email me at berecca at a o l  dot c o m if that time works for you.

My of my clay jewelry will be fairly simple but you will probably see me wearing these big fellas and more of their colorful brethen fashioned up into a conga line.

Thursday, November 1, 2012

Plenty of biscuits!

These have a lovely matte finish, the result of an experiment. More experimenting to come. The gray ones actually look like flannel!


LinkWithin

Related Posts with Thumbnails